Wednesday, February 29, 2012

Ideas in Bloom #1

It's Bloom's First Link Party. I'm a little bit nervous (and very excited) to be trying this, mostly because I'm afraid no one will link up. Keeping my fingers crossed that you will come.
So- I would love for you to share your creative holiday ideas, crafts, and parties.  Really, I would love to see anything pretty.

A few rules:

1. Please be a follower of bloomdesignsonline, (a member in bloom)

2. Link directly to your idea not your home page.

3. Insert a text hyperlink back to my blog

4. No etsy shops, giveaways or personal link parties

A HUGE thanks to my friend, Kristyn at Lil Luna for listing me on her link parties.
Come back next thursday for another link party.
Ready to bloom?


Tuesday, February 28, 2012

Pretty Perfect

My favorite party inspiration from around the web last week, without a doubt, is this cheese display.  I love the different cheeses stack on a pedestal made to resemble a cake.  Perfectly unique and clever.  You'll catch it at one of my parties soon! Amy Atlas devoted an 3 post to this party.  Check it out here.


Here's another pretty perfect cheese table I found on the web. Beautiful, simple, classy, clean, modern, love it!


XO

Monday, February 27, 2012

Make It Monday- Catch A Rainbow


Happy Day- I have been soooo busy the past few weeks putting together a birthday party for my little one.  It was Saturday.  The weather was great and the girls all had fun.  Success.  I can't wait to share it with you over the next few weeks!  Today, however, is Make It Monday.

With St. Patrick's Day right around the corner, I thought these rainbow cakes in mason jars would be a great way to celebrate the holiday.  I got the ideas for the cakes on pinterest but decided to add the phrase and label to create a cute little favors (wrapped with a bow). You could also do a healthy version of catch a rainbow by using fruit instead of cake.  In my fruit rainbow, I used purple grapes, blueberries, kiwi, pineapple, mandrain oranges and strawberries.  Cut the fruit into small pieces so the its easier to make distinct layers.

Rainbow Cakes
Supplies: white cake batter, mason jars, food dye, white frosting, labels
 Divide your batter into 6 bowls.  Add your food dye and mix.
Put the batters into ziploc bags.  This will make it easier to fill the jars without getting the batter all over the side.

Cut the tips off the bags and layer the batter into the jars.  Only fill the batter half way up the jar.  No higher.  Bake at 350 degrees for about 18 minutes.  Once the cake is cool add your "cloud" or frosting.

Top with a label and ribbon and your done.


So fun!  Happy to send you these labels if you

Leaving a comment below with your email so I can send you the file plus: 

Follow Bloom Design on Pinterest or
Become a Person in Bloom (right sidebar) or
Like Bloom on Facebook

Thanks for following!
XO

Linked up on http://todayscreativeblog.net/http://todayscreativeblog.net/
http://imtopsyturvy.com/
http://www.momomma.com/
http://diyhshp.blogspot.com/search/label/MMM


http://www.thekurtzcorner.com/

Thursday, February 23, 2012

Pretty Perfect

Did you catch this Popeye party last week on Amy Atlas?  It made my jaw drop.  Perfect detail. The cake is totally amazing.  It made me remember details about the cartoon that I had long forgotten.   The bold primary color scheme looks amazing and I love the whimpy burgers and soda bottles tied with rope. The perfect degree of nautical!
XO

Wednesday, February 22, 2012

Rainbows

Are you ready to celebrate the next holiday yet?  St. Patrick's Day is the perfect time to use some of the rainbow inspiration that's out there on the web, especially if green is not your favorite color (like me).  Kids love the magic that rainbows and little leprechauns hold.  Check out some of my favorite rainbow inspirations from Pinterest.

 If you decide to do a rainbow party, try to stick to big blocks of color rather than everything being multi colored stripes.
It creates a cleaner, fresher look. Also, if the traditional rainbow is too bright for you, switch it up- use more of a pastel color scheme.
XO

Monday, February 20, 2012

Make It Monday- Fondant Toppers

I love fondant.  I love the smooth clean graphic look that fondant creates.  I was actually scared, intimidated rather, of fondant for quite a while.  It seemed like a product for the most experienced bakers.  It was only when I became desperate for a last minute decoration for the cupcakes at my Chili Under The Oaks Party,  that I turned to fondant.


 I was sooooo pleasantly surprised.  It's just like Play Dough but for grown ups.  It has about the same consistency and you work with it in much of the same way.  Fondant is now available in the baking sections of most craft and fabric stores and comes in a variety of colors.  If the store doesn't carry the exact color you need, it's easy to dye white fondant using food coloring.  Amazingly it also molds to the shape of your item very easily.  Just a bit of smoothing with your hand and it seems to shrink up like magic. It stores very well.  You can make the toppers far in advance and keep them flat in a ziploc bag.  I also used it here

Fondant Toppers for Cookies and Cupcakes:
Supplies: rolling pin, parchment, food dye, cookie cutters or pie crust cutters, fondant
After kneading the fondant in your hands, roll it out with a rolling pin until it's about 1/16 inch thick.

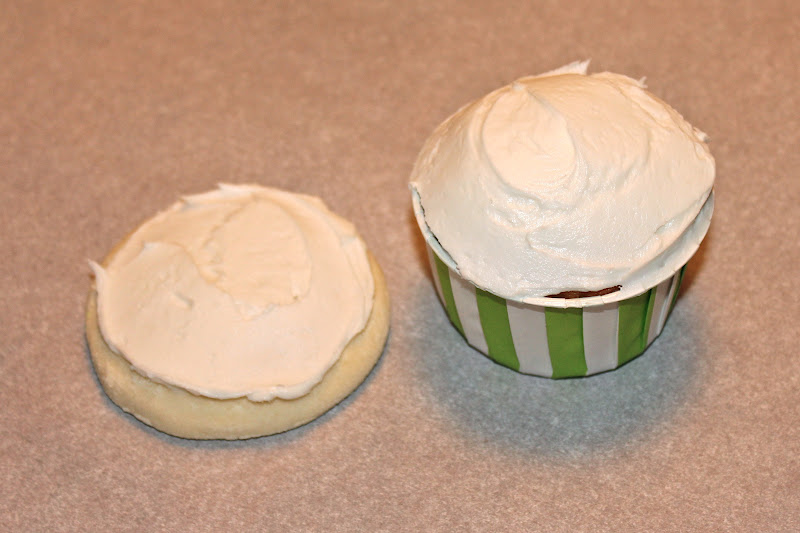
Using cookie cutters or pie crust cutters (shown in acorn topper), cut out your shapes.  You can put the shapes directly on top of your frosting, like the acorn cupcakes, or you can hide the butter cream underneath by cutting out a base.  If you want to do a base for your topper, cut out a round circle nearly the same size as your cookie or cupcake.

 
Apply a thin layer of frosting to your desserts.


Put the shapes on top of your base circle.  The shapes should stick pretty well but if you need to, put a very small smear of water in the center of the shape and it should attach well. Lay the topper on your cupcake or cookie and lightly press down.
 If you need to color your fondant, put a squirt of color in the middle of the white and knead in.
It works best if you pull it like you were making taffy.
 I wanted to match the green in this ribbon. Pretty close!
If you want to get super fancy you can add accents with butter cream or candies.  You can also add dots or lines with a tooth pick.  I'm sure they sell scoring tools for this purpose (which I am going to investigate tomorrow) but play around with things you have at home.
Now, my decorations are quite elementary.  I consider myself I pretty good baker but I have no patience for decorating.  For all you really baking artist out there, please excuse my simple and possibly flawed technique.  This is my quick, simple way to add some interest to my desserts.

Here are a few images of some amazing use of fondant from around the web

and from Half Baked


I can only dream!
XO

Sunday, February 19, 2012

More Eat, PINK, and Be Married

When my sister was getting married, I wanted to create the perfect bridal shower for her. She is such a girlie girl and the pink princess theme fit her perfectly. To set the mood for the party, my mom helped me make tons of pink pillows to put on the furniture around the pool. On some of them, I took the crown image from the invitation and transferred it to fabric to make princess pillow. I hung 100 pink paper lanterns around the yard and added tons of pink flowers in vases with my sisters new monogram. On each table, I placed a different famed quote about pink or princesses; one by Audrey Hepburn, Sara in the Little Princess, Elle Wood from Legally Blonde, and Shelby from Steele Magnolias. The invitation asked guests to wear pink which added to the mood of the party. When guest arrived, they sipped on kir royals with pink sugar around the rim of the glass and snack on pink salmon canapes. The centerpiece of the dessert table was a pink ombre cake and all the rest of the sweet treats were in shades of pink except the mini banana creme pies which are my sister's favorite. Over the table was a banner that read eat, pink and be married. Guest left with a mercury glass votive with a crown on it. 


I had a local printer cut the words for Bride to Be out of vinyl and made the sign on the chair that may sister sat in while opening her gift which most of the guest had wrapped in pink paper:) It turned out to be the perfect girlie girl shower fit for the princess that my sister is.